Using C# in Power Automate Flows
Have you ever encountered a problem in a Power Automate Flow where you knew you could solve it in minutes if only you could add a bit of custom code? Now, with just a few minutes of setup, you can do exactly that – write and use C# in Power Automate Flows.
Have you ever encountered a problem in a Power Automate Flow where you knew you could solve it in minutes if only you could add a bit of custom code? Now, with just a few minutes of setup, you can do exactly that – write and use C# in Power Automate Flows. The following blog post will guide you through the setup and list important details about this method.
Why you should use C# code in a Power Automate Flow
Using C# snippets in Power Automate flows can significantly expand what’s possible in automation, giving developers more control over logic, calculations, and custom data transformations. With your own code, you can go beyond the out-of-the-box actions and build custom connectors to perform complex processing within your flows. Moreover, it will allow you to avoid overly complicated nested structures and streamline your flows, making them easier to read, maintain, and extend.
Limitations
However, before you start, you should familiarize yourself with the limitations of this method.
- Execution Time: This method only allows for an execution time of 5 seconds. Therefore, be sure you know what the data you send to this connector looks like. If you want to parse a large dataset, you might need to split it into smaller chunks.
- File Size: You need to make sure that the code doesn’t exceed the file size limit of 1MB. If you are only using a few methods, this shouldn’t be an issue.
- Supported Namespaces: Be aware that you cannot use just any library in your code. Before you start, make sure that the libraries you need for your functionality are supported by this method. Currently, this method supports the following namespaces:
using System;
using System.Collections;
using System.Collections.Generic;
using System.Diagnostics;
using System.IO;
using System.IO.Compression;
using System.Linq;
using System.Net;
using System.Net.Http;
using System.Net.Http.Headers;
using System.Net.Security;
using System.Security.Authentication;
using System.Security.Cryptography;
using System.Text;
using System.Text.RegularExpressions;
using System.Threading;
using System.Threading.Tasks;
using System.Web;
using System.Xml;
using System.Xml.Linq;
using System.Drawing;
using System.Drawing.Drawing2D;
using System.Drawing.Imaging;
using Microsoft.Extensions.Logging;
using Newtonsoft.Json;
using Newtonsoft.Json.Linq;
How to use your C# code in your PAF
If you are aware of all the limitations of this method you are ready to set up your custom connector, which you will need to use C# in Power Automate Flows.
Setting up the Custom Connector
To use C# code in a Power Automate Flow (PAF), you first need to create a new Custom Connector.
Go to make.powerapps.com and look for the “Custom Connector” tab. If you can’t find it, click on “More” to locate it.
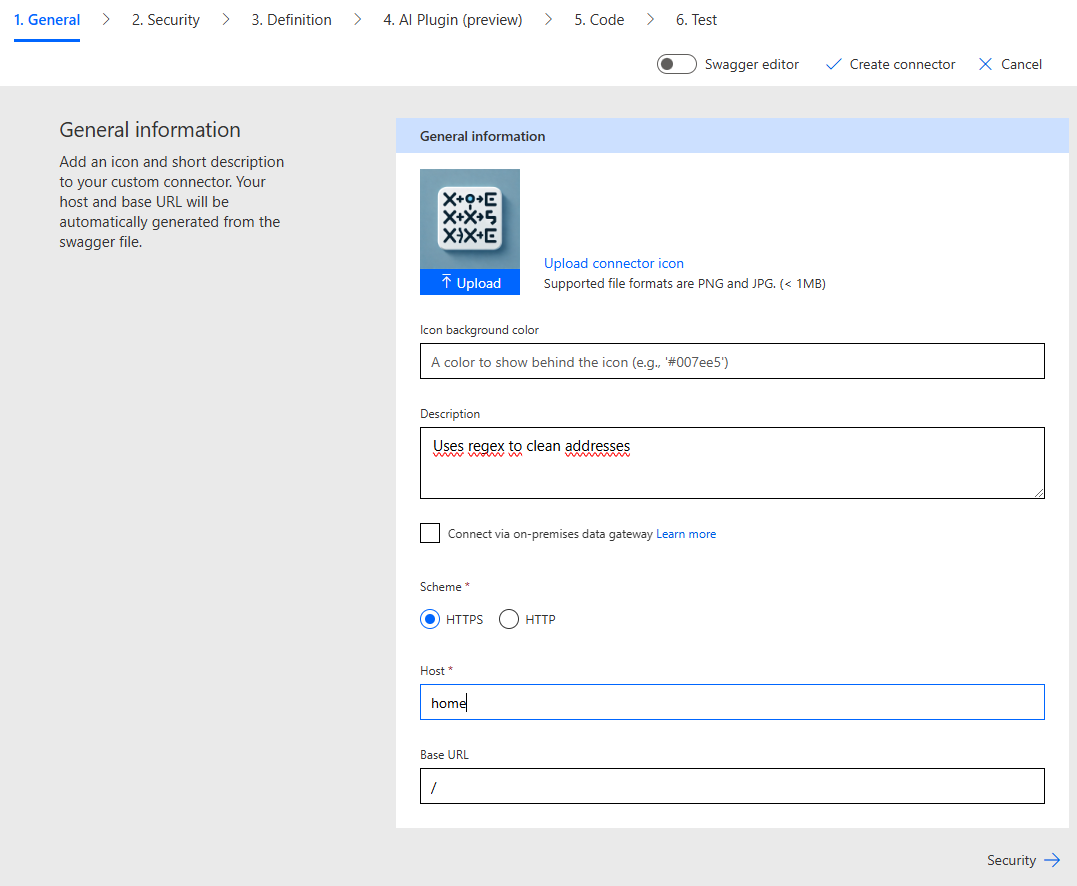
Create a new Connector from blank. You can now customize the appearance of your connector by adding an icon and changing the background color. Add a description, choose HTTPS, and fill out the hostname (enter anything, as this isn’t relevant for an actual API).
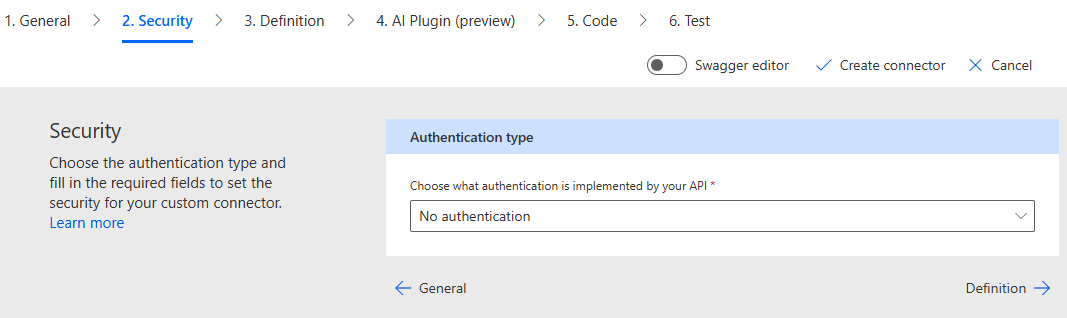
In the Security tab, choose your preferred authentication level. For this example, we’ll select “No authentication” since our code won’t expose any data.
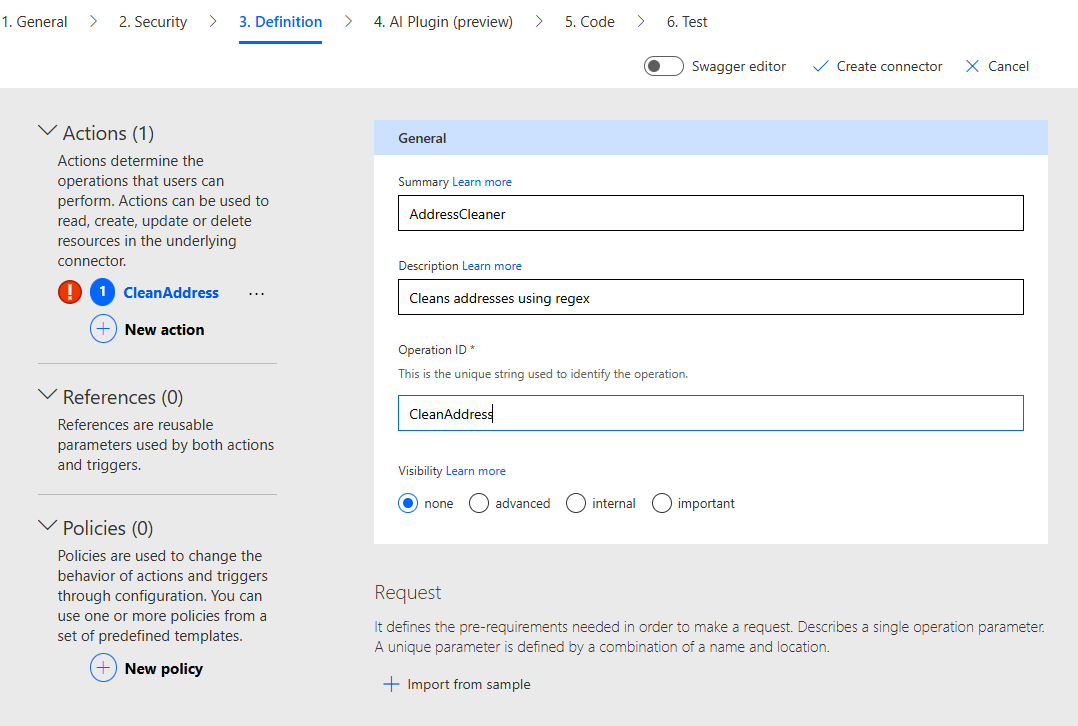
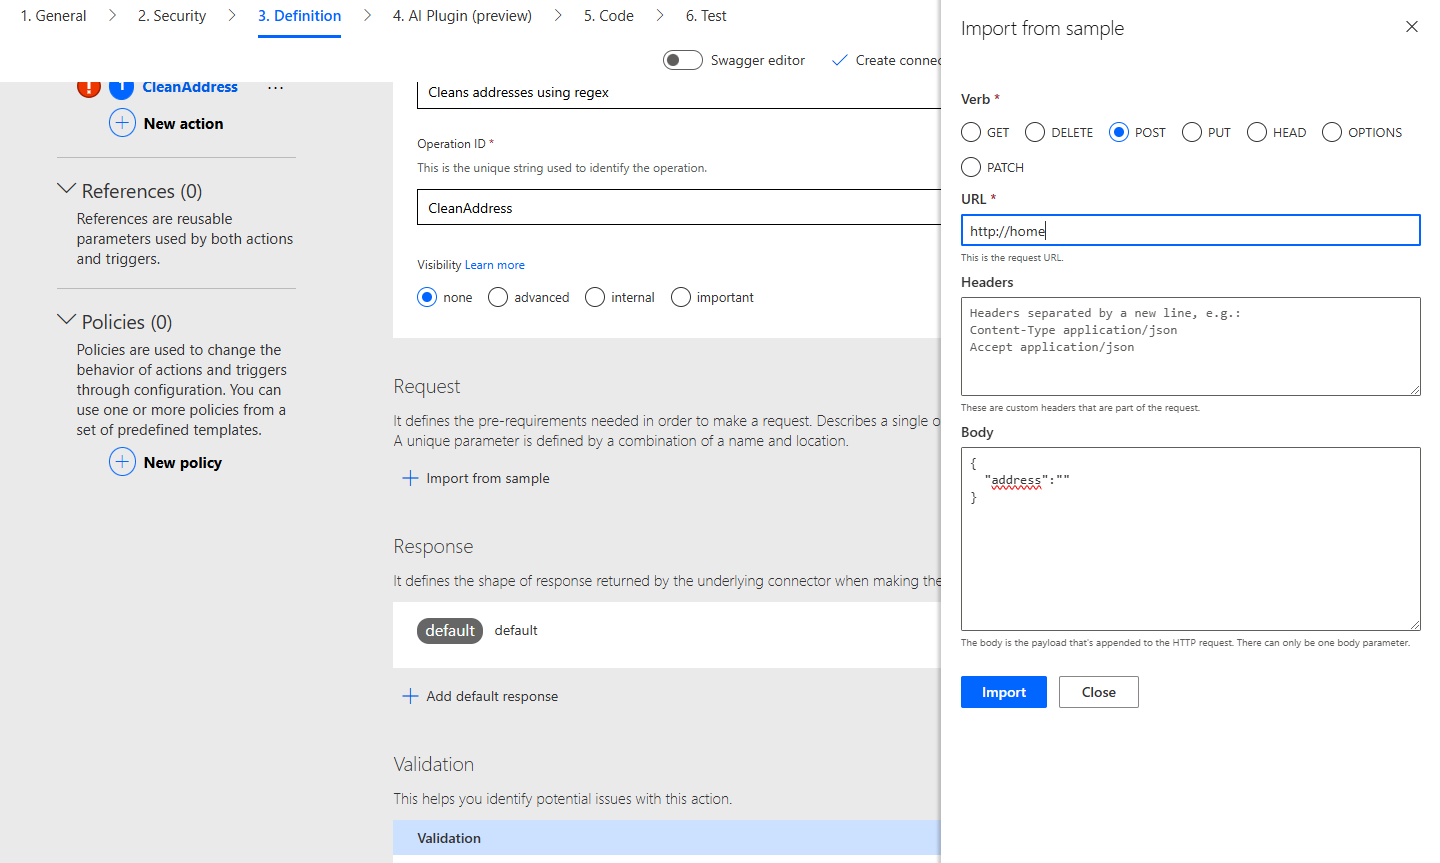
In the Definition tab, add a new Action and complete the summary, description, and operation ID.
Under Request, click “Import from sample.” Choose “POST” for the request type, enter a URL (e.g., ), and then fill out the body by adding a JSON format string. This defines what the request of the action will look like and sets up the argument structure for your custom connector.
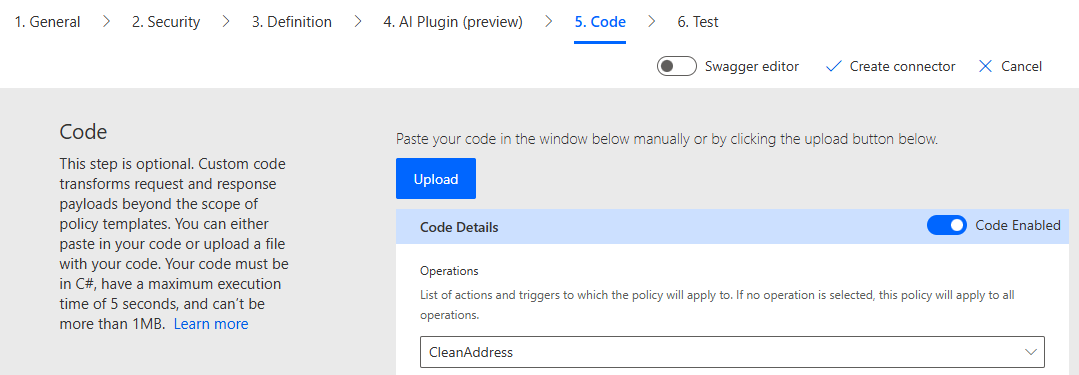
Skip the AI-Plugin section and go directly to the Code section.
Writing the C# Code
Before writing your code, enable the Code section by clicking on the slider. Choose the Action you have just defined by picking its name in the Operations list. Click “Create Connector” and wait a few seconds. Once your new connector is successfully created, you can write the code you want to execute.
Keep a few things in mind when writing your code:
- You need to use the
Script : ScriptBaseclass and wrap it around all of your code. - Implement the
ExecuteAsyncmethod, which is called during runtime. You can add your functionality within this method or define other methods within the class and call them fromExecuteAsync.
public class Script : ScriptBase
{
    public override Task ExecuteAsync()
    {
        // Your code here
    }
}
For our example, we want to keep it simple. We’ll clean some messy addresses by using a few regex replace calls and formatting the string to title case. Notice that we can’t use the „System.Globalization“ namespace, which already includes the ToTitleCase method. Therefore, we’ll need to implement it ourselves.
public class Script : ScriptBase
{
    public override async Task ExecuteAsync()
    {


        response.Content = CreateJsonContent(this.CleanAddress(contentAsString));
        return response;
    }

    public string CleanAddress(string address)
    {
        address = this.ToTitleCase(address);
        address = Regex.Replace(address, @"[#;]", "");
        address = Regex.Replace(address, @"\s*,\s*", ", ");
        address = Regex.Replace(address, @"\s+", " ").Trim();
        address = Regex.Replace(address, @"(? 0)
                words[i] = char.ToUpper(words[i][0]) + words[i].Substring(1);
        }
        return string.Join(" ", words);
    }
}
After your coding session, click “Update Connector.” If there are no immediate errors in your implementation, the connector will be updated with your custom code.
In the Test tab, click on „New connection“ and add a connection to the custom connector. Now, you’ll have the opportunity to quickly test your connector before integrating it into one of your flows.
Plugging your connector into your Power Automate Flow
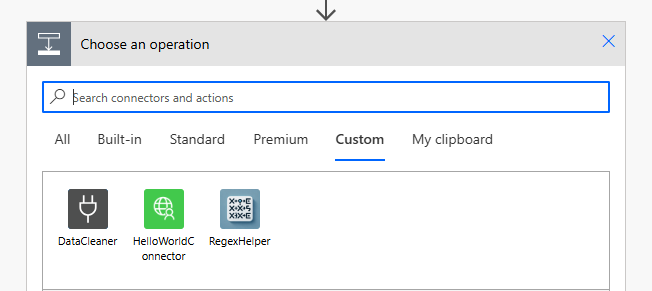
Now the hardest part is done, and you can finally enjoy the fruits of your labor by plugging the Custom Connector into your Power Automate Flow. Open a Power Automate Flow and click on “Add action.” You should now be able to find your new custom connector. Add it to the flow and fill out the request parameter.
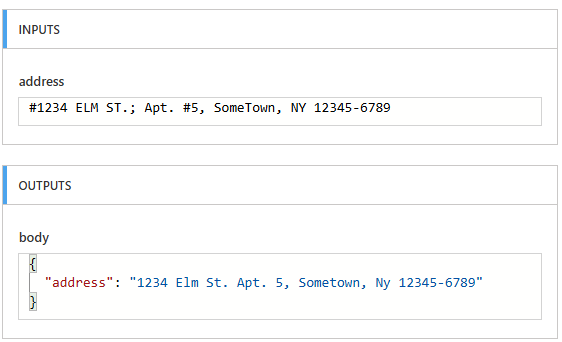
Running your flow you will see how your custom connector produces the JSON output that you have defined earlier.
To make it easier to parse the response from your custom connector, use a “Compose” connector to extract the desired parameters from the response body.
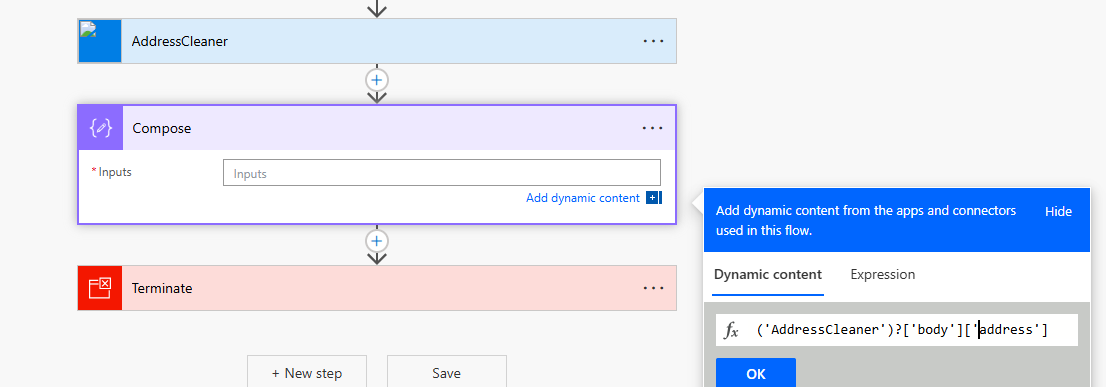
As you can see in this example, we successfully cleaned up our address using our C# code custom connector. This concludes our guide and now you should be able to use C# in your own Power Automate flows. The days of complex nesting and lengthy structures for simple string operations are over! This method offers you much more control over your Power Automate Flows.

